Dev Containers Explained: From Setup to Reproducible Builds
The modern software development landscape is complex, often plagued by inconsistent environments, "works on my machine" conundrums, and the dreaded dependency hell. Developers frequently spend precious hours setting up new projects, wrestling with conflicting tool versions, or debugging issues stemming from their local machine's unique configuration. But what if you could eliminate these headaches and guarantee a consistent, ready-to-code environment for every project, every time? Enter Dev Containers.
Dev Containers are a game-changer, revolutionizing the way teams approach development environments. They provide isolated, lightweight, and pre-configured environments right inside your favorite editor or IDE, allowing you to focus on writing code, not configuring your workspace. If you've been curious about containerizing your development but haven't taken the plunge, this comprehensive guide will demystify Dev Containers, walking you through their setup, inner workings, and the profound benefits they offer for truly reproducible builds.
What Are Dev Containers and Why Are They Indispensable?
At its core, a Dev Container is a fully functional development environment that runs inside a Docker container. Imagine having a clean, pristine operating system instance for each project, complete with all the necessary tools, SDKs, libraries, and configurations pre-installed and perfectly matched to that project's requirements. That's precisely what Dev Containers deliver.
The beauty of Dev Containers lies in their ability to package everything needed for development into a single, portable unit. This concept addresses several critical pain points in modern software development:
- Reproducibility: Every developer on a team can work within the exact same environment, regardless of their local operating system or installed software. This virtually eliminates "works on my machine" issues and ensures builds are consistent across different machines and CI/CD pipelines.
- Zero Local Setup: New team members or developers switching projects can get up and running instantly. Instead of spending days installing dependencies and configuring tools, they simply open the project in a Dev Container and start coding. This significantly reduces onboarding time and increases productivity from day one.
- Isolation & Cleanliness: Your local machine remains pristine. Project-specific dependencies, different compiler versions, or runtime libraries are encapsulated within the container, preventing them from polluting your host system or conflicting with other projects. When you're done, simply discard the container without leaving a trace.
- Portability: Dev Containers are inherently portable. The same configuration that defines your local Dev Container can be used in cloud-based development environments like GitHub Codespaces or remote servers accessed via JetBrains Gateway, offering a consistent experience everywhere. This also streamlines integration with CI/CD processes, as the build environment mirrors the development environment.
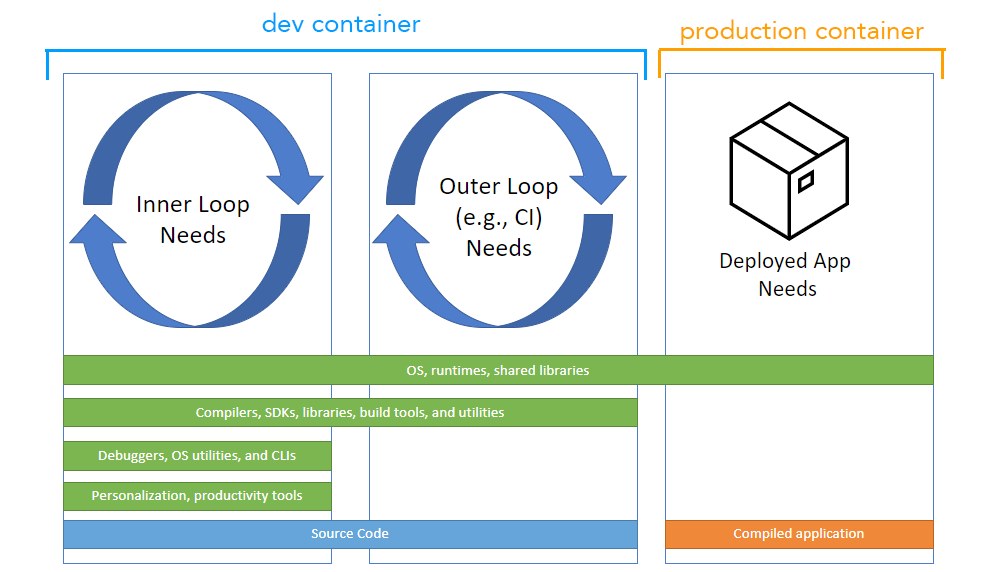
- Consistency Across the Stack: Ensure that the development environment perfectly mirrors the production or staging environment, reducing the chances of deployment-time surprises.
By providing these benefits, Dev Containers don't just save time; they enhance collaboration, improve code quality, and make developers happier and more productive. To delve deeper into how Dev Containers can truly transform your workflow, you might find our article Dev Containers: Supercharge Your Dev Workflow and Productivity particularly insightful.
Dev Container vs. Docker Container: Understanding the Nuance
While Dev Containers heavily leverage Docker, they are not merely "Docker containers." Docker containers are a fundamental technology for packaging and running applications in isolated environments. A Dev Container, however, is a *specialized application* of Docker specifically tailored for the development workflow.
The key distinction lies in purpose and integration. A standard Docker container is typically designed for deploying an application or service. A Dev Container, on the other hand, is built to host an entire development environment, integrating seamlessly with your IDE (like VS Code or JetBrains IDEs) to provide features such as:
- Mounting your local project code directly into the container.
- Running an SSH server or similar service within the container for editor communication.
- Installing editor extensions directly into the container's environment.
- Forwarding ports automatically for local access to services running in the container.
In essence, all Dev Containers are Docker containers, but not all Docker containers are Dev Containers. Dev Containers add a layer of configuration and IDE integration on top of Docker to create a sophisticated, user-friendly development experience.
Setting Up Your First Dev Container: A Practical Walkthrough
Getting started with Dev Containers is surprisingly straightforward, especially with modern IDE support. Here’s a step-by-step guide to spinning up your first containerized development environment:
1. Prerequisites: What You'll Need
Before you dive in, ensure you have these essentials:
- Docker Desktop (or Docker Engine on Linux): This is the foundation for running containers.
- VS Code with the Remote - Containers extension installed, or a JetBrains IDE with the Dev Containers plugin. GitHub Codespaces users will find this baked in.
2. The `.devcontainer` Folder: Your Configuration Hub
Every Dev Container project starts with a `.devcontainer` folder at the root of your workspace. Inside this folder, you'll typically find two crucial files:
- `devcontainer.json`: This JSON file is the heart of your Dev Container configuration. It tells your IDE how to build and run the container, what settings to apply, which extensions to install, and more. VS Code, for instance, provides handy snippets to generate this file for popular tech stacks (Node.js, Python, Go, etc.).
- `Dockerfile` (Optional but Recommended): While you can reference a pre-existing Docker image directly in `devcontainer.json`, a `Dockerfile` allows for granular customization. It defines the base image and specifies additional commands to install tools, dependencies, or make system-level changes within your container.
Example `devcontainer.json` Snippet:
{
  "name": "My Node.js Project",
  "build": {
    "dockerfile": "Dockerfile",
    "context": ".."
  },
  "customizations": {
    "vscode": {
      "settings": {
        "editor.wordWrap": "on"
      },
      "extensions": [
        "dbaeumer.vscode-eslint",
        "esbenp.prettier-vscode"
      ]
    }
  },
  "forwardPorts": [3000, 5000],
  "postCreateCommand": "npm install"
}
Example `Dockerfile` Snippet (if specified in `devcontainer.json`):
FROM mcr.microsoft.com/devcontainers/javascript-node:18

# Install custom tools or dependencies
RUN apt-get update && export DEBIAN_FRONTEND=noninteractive \
    && apt-get -y install --no-install-recommends git zsh

# Set environment variables
ENV MY_CUSTOM_VAR="hello from dev container"
Choosing a base image for your Dev Container is a critical first step. You can opt for general-purpose images (like Ubuntu or Debian) for maximum control, or specialized images (like `mcr.microsoft.com/devcontainers/javascript-node` or `python`) that come pre-packed with language runtimes and common tools. While specialized images offer faster setup, general images give you the flexibility to fully customize every aspect of your environment.
3. Launching Your Dev Container
Once you've configured your `.devcontainer` folder:
- Open your project folder in VS Code or your JetBrains IDE.
- Your IDE will detect the `.devcontainer` folder and prompt you to "Reopen in Container" (VS Code) or similar.
- Clicking this option triggers the Dev Container extension. It will either build the Docker image (if a `Dockerfile` is present) or pull a pre-existing image, then create and connect to the container.
- Your project folder will be automatically mounted into the container, and your editor will seamlessly connect to this isolated environment. You're ready to code!
If you ever need to rebuild a fresh instance of your container (e.g., after modifying your `Dockerfile` or `devcontainer.json`), simply run the "Remote-Containers: Rebuild and Reopen in Container" command from your IDE's command palette.
How Dev Containers Work Under the Hood
Understanding the internal mechanics of Dev Containers can deepen your appreciation for this technology:
- Detection: When you open a project in an IDE that supports Dev Containers, it scans for the `.devcontainer` folder. If found, it prompts you to open the workspace in the container.
- Image Building/Pulling:
- If your `devcontainer.json` specifies a `dockerFile` (e.g., `"dockerfile": "Dockerfile"`), the IDE executes a `docker build` command using your `Dockerfile` to create a custom Docker image.
- If it references a direct image (e.g., `"image": "mcr.microsoft.com/devcontainers/go:1.21"`), no build is needed; the image is pulled if not already cached locally.
- Container Creation and Connection: The IDE then runs a `docker run` command using the newly built or pulled image. Crucially, it performs several key actions:
- Bind Mounting: Your project's local folder is "bind mounted" into a specific path inside the container (e.g., `/workspaces/
`). This means any changes you make locally are instantly reflected in the container, and vice-versa. - Tooling Injection: The IDE's remote extensions or helper processes are injected into the container to enable seamless integration (e.g., terminal access, debugger attachment, file explorer).
- Port Forwarding: Any ports specified in `devcontainer.json` (e.g., for a web server) are automatically forwarded to your local machine.
- Bind Mounting: Your project's local folder is "bind mounted" into a specific path inside the container (e.g., `/workspaces/
- Environment Ready: Once connected, your IDE functions as if you're developing directly on your local machine, but all commands, processes, and tools are executing within the isolated Dev Container.
This intricate dance ensures that you get the responsiveness and familiarity of local development with the power and consistency of a containerized environment. For more in-depth knowledge about mastering these isolated environments, check out Dev Containers Unpacked: Mastering Isolated Development Environments.
Advanced Tips for Mastering Dev Containers
While the basics get you started, these advanced tips can further optimize your Dev Container experience:
- Pre-building Images: For large teams or complex environments, consider pre-building your Dev Container images and pushing them to a private registry. This drastically reduces the initial setup time for developers, as they only need to pull the image instead of building it.
- Multi-Container Setups with Docker Compose: If your project involves multiple services (e.g., a frontend, a backend API, and a database), you can use Docker Compose within your `devcontainer.json`. This allows you to orchestrate an entire suite of interconnected containers for your development environment.
- Dotfiles Integration: Many developers use dotfiles to manage their shell configurations (e.g., Zsh, Oh My Zsh), Git aliases, and editor settings. Dev Containers can be configured to automatically clone and install your dotfiles repository, ensuring your personalized shell and tool configurations are available inside the container.
- Lifecycle Hooks: The `devcontainer.json` supports various lifecycle hooks (e.g., `postCreateCommand`, `postStartCommand`, `postAttachCommand`). Use these to automate tasks like installing project dependencies (`npm install`, `pip install`), running database migrations, or starting background services.
- Persistent Data Volumes: For databases or other services that require persistent storage, you can configure Docker volumes in your `Dockerfile` or `docker-compose.yml` to ensure data isn't lost when the container is rebuilt or deleted.
- Security Best Practices: Always use specific image tags (e.g., `node:18-slim`) instead of `latest` to ensure reproducible builds. Keep your Dockerfiles lean, minimize the number of layers, and avoid running as root inside the container unless absolutely necessary.
Conclusion
Dev Containers represent a significant leap forward in developer experience and team collaboration. By providing isolated, reproducible, and portable development environments, they eliminate countless hours lost to environment setup and configuration woes. From ensuring every developer works with the identical toolchain to streamlining onboarding and enhancing CI/CD integration, the benefits are undeniable. If you haven't embraced containerized development yet, now is the time to give Dev Containers a try. They will not only make you a happier and more productive developer but will fundamentally change the way your team approaches project development. The future of development is containerized, and Dev Containers are leading the charge.